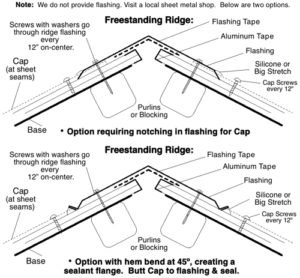
Purchase flashing from sheet metal shop. Do drawing that shows dimensions, angle, etc. Sheet metal to be minimum of .019″ aluminum or 30 ga. steel. If purchasing a metal building frame get their ridge flashing, or off shelf at lumber yard. In high wind area use Big Stretch to bond tip of Flashing to poly. See details below.
1) The easiest method of installation is to set and screw down a section of flashing that covers the first sheet of polycarbonate (on freestanding greenhouses install sheets on both sides of the greenhouse). Set screws so flashing presses against polycarbonate, place a bead of sealant at this point { Lean-To Ridge & Freestanding Ridge } and stop there. Lay the next sheet of polycarbonate and fasten the Cap so that it butts against the edge of the flashing that comes in contact with the polycarbonate. Now screw down the flashing and place a bead of sealant along the edge of flashing that comes in contact with the polycarbonate, and also where the Cap comes in contact with the flashing. Continue installing more polycarbonate and flashing. Overlap seams in flashing a minimum of 4″. This method provides a watertight installation, but care must be taken to lay a smooth bead of sealant on a cleaned surface.
2) A more difficult, but a cleaner looking and tighter installation involves installing the flashing after all sheets are set. See { Lean-To Ridge & Freestanding Ridge }. This involves acquiring access to the ridge with all polycarbonate in place. This can be tricky and is best performed by individuals accustom to working on roofs or in situations where balance and care during installation procedures is second nature. If you are working on an attached greenhouse you may be able to gain access to this detail from the roof of the adjoining structure.
